In this article we will be setting up VS Code for C/C++ development.
Video version of this article
If you prefer a video here it is Note that the video is in telugu language so suppplement it with the article for better understanding
Check if gcc is already installed
VS Code is a code editor and C/C++ are compiled languages so VS Code needs a compiler to compile and run the program.
We will be using gcc as the compiler so we need to check if gcc is already present in our system before proceeding to install gcc.
Open a command prompt and run the command
gcc --versionIf you get the following output:
‘gcc’ is not recognized as an internal or external command, operable program or batch file.
then you don’t have gcc installed and you can proceed to the next step.
But if you get the following output

You can skip the compiler installation process as you already have a gcc installed on your system.
How to Install gcc(C\C++ compiler) on windows 11
Go to MSYS2 official site there you will see download the installer heading under which there is a link to download the latest version of the package.
or you can download it from our telegram channel where we have all the softwares you will need available for download from one place.
Double click the downloaded package to run it and proceed with all the default options by clicking next as we don’t need to change any of the default options.
After you finish the installation MSYS2 will automatically open if it doesn’t search for the program by clicking windows key and typing MSYS2 into the search bar.
Now inside the MSYS2 terminal type the following commands in the respective order
The following command will update the core dependencies and all the packages currently installed on MSYS2
pacman -Syuafter the above command is executed successfully MSYS2 will restart for the process to complete
Now run the following command
pacman -SuNow that all our packages are updated and MSYS2 is properly installed on our system it’s time to install mingw-x64 to do this run the given command in the MSYS2 terminal.
pacman -S mingw-w64-x86_64-gccThis will install the mingw compiler but we also need to install a debugger we will be installing gdb for that run this command in your MSYS2 terminal:
pacman -S mingw-w64-x86_64-gdbAdd gcc to path
In this section we will add the gcc compiler to the path of our system so that we can access it from anywhere in our system.
while installing MSYS2 if you had kept all the default options you
will find the bin folder in the following path
C:\msys64\mingw64\bin
now tap the windows key and start typing environment in the search bar you will see a option caome up called ** edit the system environment variables** click on it
Now click on environment variables and in the popup that appears click on path and select the edit option below in the next popup that appears click new which is in the top right corner of the popup window.
In the blank paste the path to your gcc installation in most cases it
is C:\msys64\mingw64\bin now click ok in all the popup’s that have
previously appeared to close them and to apply the new settings
Open a new cmd and run gcc --version now you will see the version
number of gcc installed in your system.
Setup VS Code
Now that we have a C\C++ compiler installed let’s setup VS Code go to the extensions tab and search for c and install the C/C++ extension by microsoft.
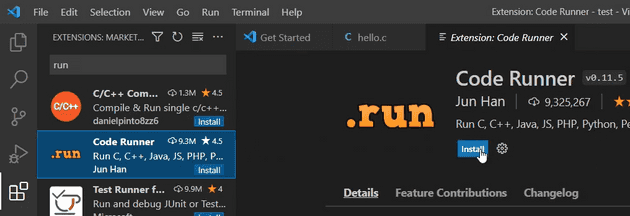
Let’s also install a extension called ** Code Runner ** by Jun Han it helps in running the code quickly and gives us a run button to just run the program and show us the output.
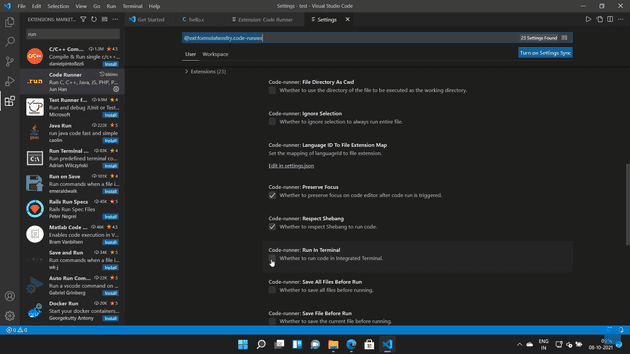
We need to change a option in the code runner settings before we start using it. You see code runner shows the output in the output tab because of this we cannot give input to our program during run time to change this behaviour and make code runner run our program in the command prompt.
Click on the settings icon visible beside the uninstall option and click on it then click on Extension Settings
In the options now presented to you look for ** Run in Terminal ** option and tick it and close the tab.
Run hello world program
Now let’s run a hello world c program to see if our installation is succesfull open vs code from inside a folder and create a new file called hello.c refer to the video tutorial if you don’t know how to do this.
#include <stdio.h>

int main() {
    printf("Hello world!");
    return 0;
}
Now to compile and run hello world program in the cmd open vs code
terminal and type gcc hello.c this will compile our code now to run
the compiled program. run .\a.exe you will see the program output as
Hello world! appear in your terminal.
To run the programs using code runner you can just click the run button in the top right of your window this will show you the output of your program in the terminal.
and that is how you setup your system and configure VS Code for C\C++ development.


